Wednesday, 17 December 2008

Day 5

Here we have a lovely collaged wallet from Arlene Travnik. The top layer is a sheer white organza and there are beads and buttons and charms all trapped within pockets under the fabric. Perfect for a distraction while waiting in line at the checkout! (I have been playing with it all afternoon anyway!) Thanks Arlene!


Tuesday, 16 December 2008

Little embroidered xmas tree - a tutorial

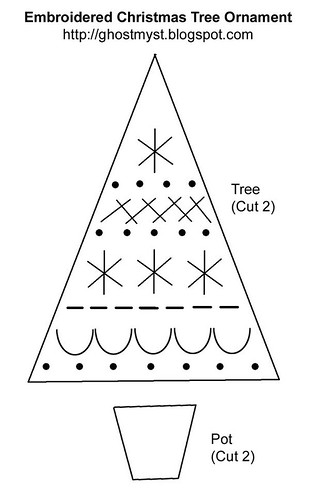
I made these little trees for the Kiwi Christmas Ornament Swap. They were such fun that I thought I'd share the process in a tutorial.

Read on and soon you too will have a little embroidered forest...

(Click here to get the full sized pattern)

Supplies:
Cream felt
Blue felt
Fabric of your choice for back side (I used craft cotton and sealed the edges with a dab of glue to stop them fraying. You could use felt for this side as well, and even embroider it if you feel keen!)
Embroidery thread in pale blue, mid blue and dark blue
Embroidery needle and beading needle
Silver seed beads
Cream organza ribbon
Stuffing
Wash-away fabric pen

Cut out one tree shape from cream felt, and one from the backing fabric. Cut two of the pot shape from blue felt.

Transfer the design to the cream felt with a wash-away transfer pen.

Using 3 strands of thread: embroider the bottom row of french knots in mid blue.

Embroider the middle row of french knots in mid blue.


Embroider the top row of french knots in pale blue.

Still using 3 strands: Make a line of running stitch in pale blue thread.

Make a line of herringbone stitch in dark blue thread.

Make a line of scallop stitch in dark blue thread.

Now using one strand of thread: Make the top lazy daisy in mid blue.

Switch to a beading needle if neccessary and stitch on a silver seed bead.

Do the same for the row of 3 lazy daisies. All the embroidery is now complete! Rinse in some water to wash away the pen lines, and let dry.

Take your two blue pot pieces and sandwich a piece of batting in between them (use a small piece of stuffing if you don't have batting).

Blanket stitch the two pieces together. It doesn't matter if the batting pokes out at the top a bit.

Now, take your embroidered felt and backing fabric, and place them wrong sides together. Pin them if you like. Holding the tree upside down, begin blanket stitching about 1cm in from the top left corner.

When you are about 1.5cm from the top, take a piece of ribbon about 17cm long. Fold it in half and pinch the 2 ends between the felt and backing fabric. Hold it in place as you stitch around the top of the tree.

When you get back to the bottom of the tree, stitch about 1cm past the corner. Then fill with stuffing. Use a paintbrush or something similar to push little wads of stuffing into the corners.

Insert the pot into the gap and continue stitching to close the gap.

To finish off, tie a bow at the top with matching ribbon. Secure at the back with a dab of glue if neccessary.


Day 4

Today's gift is this amazing house plaque by Jeannine Peregrine. You all know how much I love houses so this piece is just perfect for me. The house has a beautiful texture washed over with a lovely muted burgundy - I just want to keep touching it! Thanks Jeannine - I can't wait to hang it up :)

Monday, 15 December 2008

Day 3

Today's gift was packaged in a tiny box. It didn't rattle much when shaken... hmm, not jewellery then?

But yes, it is jewellery! Cleverly packaged inside a plastic bag so present-shakers would be fooled.

This soldered domino charm pendant is by Amy Huff. Amy is a soldering queen! It's perfectly smooth, perfectly shiny and perfectly lovely.

And customised with my initial. Thanks so much Amy!

Sunday, 14 December 2008

Day 2

Today's giftie, gorgeously wrapped in gold, is from Penelope Harris.

Inside is this teeny palm sized book, with a soft velvety cover and a golden cord on the spine.

The book is full of pockets and the pockets are full of cards. The book tells a story of Alchemy:

A form of Chemistry & Philosophy practiced in the Middle Ages & Renaissance, loosely having these goals: Transmutation of Base Metals into Gold & Silver and the Creation of an Elixir to prolong Life. Also referring to any Process which aims to turn a Common Substance (usually of little value) into a Substance of Greater Value.

Thank you so much Penelope - you are a bookbinder extraordinaire!

A winner is announced

Fuzzmo and I drew the name of a winner this morning. It is....

Christine!

Congratulations Christine, let me know which print you want me to send you.

Thank you to everyone who entered and left nice comments about the show. It means a lot to me that you took the time to do so. I hope to see you all back next year for Gothic Punk number 5!

PS. The Fuzzmo is by Roseanne Jones and came home with me after the show :)

Saturday, 13 December 2008

Christmas is a time for greed

Okay, I know it's not really, but if you read my blog over the next couple of weeks you might be forgiven for thinking so. Have a look at this pile of presents:

I get to open one of these a day for the next 12 days *rubs hands together*. It's for a fabulous swap I'm participating in called the 12 Days of Christmas swap. I made 12 gifts for 12 people and each of them made a gift for me. Each gift is numbered, and we open one per day counting down to Christmas. Fun, yes?

These are my wrapped gifts. I meant to show you this picture before now, but you'll have to wait till Day 6 to see what's inside!

But now...
Day 1
The first beautiful gift is from Kathy Strittmater. This gorgeous pendant is made from a metal bullet casing and embellished with silver wire, beads and French text. (It came packaged in the little bag!) Awesome, I look forward to wearing it and having people ask me what it's made of ;)
Thank you Kathy!

Last chance

I have some more photos of the show and they can be viewed at my Flickr page here.

And today is the last day you can enter my giveaway draw. Go here to enter (I'll be announcing the winner tomorrow!)

Saturday, 6 December 2008

A garden tiki tour

Summer is officially here and the weather is beautiful. Hot days and warm nights mean everything (including me) is thriving. This is how my garden grows:

A rambling, cottagey wilderness of flowers and vegetables cohabiting peacefully.

Sweet and delicious sugar snap peas to be eaten for tea (or straight from the garden if you can't help yourself).

Strawberries thrive in hanging baskets and the birds don't come this close to the house.

Pretty maids all in a row... Guarding the door are the two ballerina apples Waltz and Bolero. Next is a blueberry in a blue pot, seven tomatoes, a lemon twig, and peeping around the corner...

Miss Rose Chiffon, my darling miniature peach tree.

If you look under the cover of the leaves you can see her babies. They are soft and green and fuzzy and the shape of a blob of glue from a hot glue gun - a fat round teardrop.

Pots on the steps can be changed with the seasons.


Miss Bolero and Miss Waltz also have babies... this is Miss Waltz's and she promises to be ripe later in the summer.

These little pansy sisters begged me to take their photograph.


I love to mix and match in the garden. This basket contains thyme, geranium and a lovely black succulent.

This is a potentilla which I grew from seed. It took two years to flower and I had all but forgotten what it was supposed to look like. I began to expect insipid, tiny pastel flowers, but what I got instead were these amazing watercolour-painted petals.

And finally, because I have got a fancy-pants new camera and because this is a garden post, here is the obligatory insect macro:

He turned his butt to me at the last second, then buzzed and flew away.

Hope you enjoyed this little tour. I for one always enjoy seeing what others are doing in their gardens!

(My print giveaway contest is still open. If you haven't entered already, just go here!)

LinkWithin

Related Posts Plugin for WordPress, Blogger...