Tuesday, 23 December 2008

Day 11


Today's gift is a sweet little stuffed birdie from Liz Smith. Each side is made from a different patterned fabric. In the bottom photo my birdie is looking a bit unsteady... or perhaps he has eaten too much christmas pudding?! Thanks Liz for this lovely ornament!

Only one more gift left... don't forget to stop by tomorrow and see what it is!

Kiwi Christmas Ornament Swap


One Christmas swap is never enough, so this year I also took part in an ornament swap run by Louise of Twenty Cent Mixture. This one was for crafty kiwis only, and while it's always fun getting international mail, it was nice to keep it all in the neighbourhood (so to speak) for this swap.

From left to right I received: wise man by Mariana Reinoso, heart ornament by Norma McDonald, stocking embroidery by Pauline Smythe, owl by Shelley Gardner, and angel ornament by Lucy Rust. I recommend checking out these ladies' blogs!

And now for a bit of a sad confession: all these lovely ornaments, and I don't even have a christmas tree! Our flat is just too small and already overflowing to squeeze one in. I had plans this year to decorate the mantelpiece, but somehow that never happened. I've spent most of my spare time working on handmade presents which meant little things like housework and decorating got put to one side! I do however have photos of some of the things I've been working on but will wait till after The Day to share those.

Monday, 22 December 2008

Day 10

This trio of cuties is from Barbara Atwell. They are made from vintage photos printed onto paper, then stitched and stuffed. So cute!

I love the glitter on this girl's hat! Thanks Barbara!

Day 9

Today's gift is from Lisa Ryder. Lisa sent some amazing art pieces, including a collaged canvas (background) in beautiful muted hues...

And a fabulous set of ATCs! I spent ages looking at these yesterday, before coming down with a bad headache (NOT brought on by presents!) which is why I'm late posting.

Thanks for all this arty goodness Lisa, I'm thrilled to have it all in my collection!


Saturday, 20 December 2008

Day 8

Here is yet another beautiful gift. This one (well two actually) is from Fiona Mortimore. The ornament is made of printed linen fabric with lovely hand-stitched embellishments. I love the fabric - brilliant red contrasting with natural linen, just beautiful! Fiona also sent a bookmark which I am using already - it's nice and big so should stay in my book, rather than falling out as scraps of paper tend to do! Thank you very much Fiona!

Day 7

I'm a bit late posting Day 7 because we went out for the end of year work do last night. It was a fun night and I had some really good penne with lamb, fetta and smoked tomatoes... yum! But without further ado, take a look here:

This little pouch is from Dawn Supina and it's made from an altered tie!


Inside were these laminated cards: Permission to Play, Permission to Make Mistakes and Artist of the Year. They all have encouraging words on them and will be just perfect to have around for those times when I want to give up because a project is going badly! Thank you Dawn for this lovely thoughtful gift.

Thursday, 18 December 2008

Day 6

Today was my day - number six! I sent everyone a crochet cuff bracelet. They were made in different colours according to people's favourite colours. (As you can see, a lot of people like red and aqua!)

I wasn't left out, however. I got to open the lucky #13 gift from Lelainia Lloyd, which each person in the swap opens on the day everyone else is opening their gift. I have to keep the contents a secret until everyone else has opened theirs though... but trust me when I say it's a wonderful thoughtful present. Thanks Lelainia!

Wednesday, 17 December 2008

Day 5

Here we have a lovely collaged wallet from Arlene Travnik. The top layer is a sheer white organza and there are beads and buttons and charms all trapped within pockets under the fabric. Perfect for a distraction while waiting in line at the checkout! (I have been playing with it all afternoon anyway!) Thanks Arlene!


Tuesday, 16 December 2008

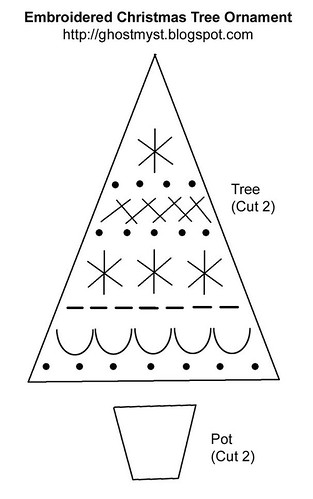
Little embroidered xmas tree - a tutorial

I made these little trees for the Kiwi Christmas Ornament Swap. They were such fun that I thought I'd share the process in a tutorial.

Read on and soon you too will have a little embroidered forest...

(Click here to get the full sized pattern)

Supplies:
Cream felt
Blue felt
Fabric of your choice for back side (I used craft cotton and sealed the edges with a dab of glue to stop them fraying. You could use felt for this side as well, and even embroider it if you feel keen!)
Embroidery thread in pale blue, mid blue and dark blue
Embroidery needle and beading needle
Silver seed beads
Cream organza ribbon
Stuffing
Wash-away fabric pen

Cut out one tree shape from cream felt, and one from the backing fabric. Cut two of the pot shape from blue felt.

Transfer the design to the cream felt with a wash-away transfer pen.

Using 3 strands of thread: embroider the bottom row of french knots in mid blue.

Embroider the middle row of french knots in mid blue.


Embroider the top row of french knots in pale blue.

Still using 3 strands: Make a line of running stitch in pale blue thread.

Make a line of herringbone stitch in dark blue thread.

Make a line of scallop stitch in dark blue thread.

Now using one strand of thread: Make the top lazy daisy in mid blue.

Switch to a beading needle if neccessary and stitch on a silver seed bead.

Do the same for the row of 3 lazy daisies. All the embroidery is now complete! Rinse in some water to wash away the pen lines, and let dry.

Take your two blue pot pieces and sandwich a piece of batting in between them (use a small piece of stuffing if you don't have batting).

Blanket stitch the two pieces together. It doesn't matter if the batting pokes out at the top a bit.

Now, take your embroidered felt and backing fabric, and place them wrong sides together. Pin them if you like. Holding the tree upside down, begin blanket stitching about 1cm in from the top left corner.

When you are about 1.5cm from the top, take a piece of ribbon about 17cm long. Fold it in half and pinch the 2 ends between the felt and backing fabric. Hold it in place as you stitch around the top of the tree.

When you get back to the bottom of the tree, stitch about 1cm past the corner. Then fill with stuffing. Use a paintbrush or something similar to push little wads of stuffing into the corners.

Insert the pot into the gap and continue stitching to close the gap.

To finish off, tie a bow at the top with matching ribbon. Secure at the back with a dab of glue if neccessary.


Day 4

Today's gift is this amazing house plaque by Jeannine Peregrine. You all know how much I love houses so this piece is just perfect for me. The house has a beautiful texture washed over with a lovely muted burgundy - I just want to keep touching it! Thanks Jeannine - I can't wait to hang it up :)

LinkWithin

Related Posts Plugin for WordPress, Blogger...