Saturday 26 September 2015

Puff Stitch Pincushion crochet pattern

 I've been working on squares for my latest blanket, and having a lot of fun with the process. I've made a lot of circles and soon the time will come to add the last round of stitches and turn them into squares. As happy as that thought makes me, I'll miss having all these circles around, so I decided to turn a couple of them into a pincushion. I really needed one to store all my yarn needles as I am forever losing them down the couch, so it was the perfect opportunity to fulfil several needs!

 The spaces between the puffs are great for jamming a thick needle in! You can also attach safety pins or stitch markers around each puff.

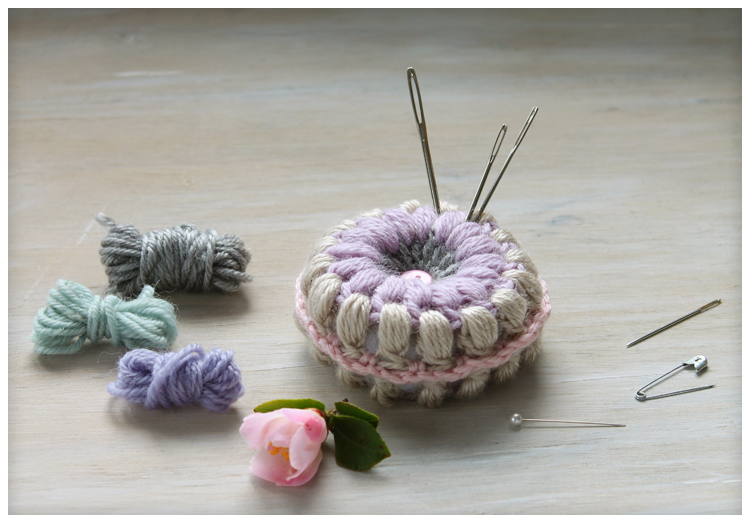
You could use this as a scissor keep, although I find those a bit bulky, so I just made a loop for it so I can pin it to the side of the couch when I need to keep it handy.

Puff Stitch Pincushion crochet pattern

Working a puff stitch: yo, insert hook into space and pull yarn through (3 loops on the hook), repeat 3 times (9 loops on the hook). Keep your tension quite loose as you are doing this - the loops should not be wrapped tightly around the hook. Yo again, then carefully draw the hook through 8 loops (2 loops on hook). Yo and draw the hook through the last 2 loops.

Round 1: Ch 4, make 15 treble crochet stitches into a magic ring.
Round 2: Ch 2, make 16 puff stitches, working into the space between each tr, with 1 ch between each puff.
Round 3: Repeat Round 2. Fasten off.

Make two circles, then hold them wrong sides together. Work all stitches into both circles to join them. With a contrasting yarn, attach with a slip stitch into one of the ch 1 spaces. Ch 1, 1 sc into same space, ch2, 1 sc into space between puffs, repeat until 3/4 of the circles are joined. Stuff the pincushion, then finish joining. Before fastening off, ch 20 to make a loop for hanging. Join the end of the loop and fasten off.

Take 2 small buttons and sew them one on each side of the pincushion, drawing the thread tight between the buttons. Fasten off thread.

Sunday 20 September 2015

September flowers

 Hello September, where did you go? I seem to have blinked and missed it. Spring might be here but Mother Nature hasn't got the memo and is still lashing us with cold and wet wintery weather! It's not time to take the flannelette sheets off the bed just yet.

I did actually have last week off from work and we did, actually, have a couple of warm days in there... they are a distant memory now. My aim was to get stuck into the garden, in particular the front garden which has been a bit neglected. We had the drive repaired recently and it looks amazing, meaning everything else looks shabby in comparison, and I wanted to enlarge the beds and put more plants around the roses, etc etc... I'll go into more detail in another post when the beds have filled out a bit and look more photo-worthy. Suffice to say, I got about half of what I wanted done! It was hard work digging, planting and shifting things. I'm pleased with the effort though and if I had another week off I'd get the lot finished... alas I'm back at work next week so it will be back to the weekend gardening, as long as the weather behaves.

Things are waking up in the flower garden, slowly due to the long winter and cold start to spring. If I look back at photos from previous years I can see that everything is set back a bit in comparison. I still have plenty of bulb and blossom though...

Above, from top left: ipheion uniflorum (spring star), fondant hyacinth, a posy of daffodils and geranium, peach blossom, almond blossom, vintage looking pansy, camellia fairy blush, pink and purple anemones, paper daisies, anemones in their natural habitat, yet another anemone, monarch daffodils.

This is the spring planting lining my driveway. It's a riot of pastel frills and ruffles and smells just heavenly. It fills out a bit every year and will only improve as the camellias get taller. Interestingly enough, the hyacinths have put on a much better show than last year and I wonder if it's due to cooler temps or more frosts or something... a lot of spring bloomers seem to be improved by frost first. Anyway, working out the front has been much improved by having this to look at, and I've even had passing neighbours stop and tell me how nice it looks. That spurs me on... hopefully I'll be able to get the rest of it up to standard soon!

Linking up to Garden Bloggers' Bloom Day even though I'm a few days late...

Styling the Seasons - September 2015

Welcome to my September post for Styling the Seasons! September is the first month of spring so of course I had to do something light, bright and flowery. I foraged through the garden for the early bloomers - anemones, pansies, geraniums and hyacinths - and set up this display in my hall. 

The heady scent from hyacinths and these earlycheer daffodils fills the space and drifts into adjoining rooms. I have lots of daffs and hyacinths in my garden this year so I'll be able to replenish the vases quite a few times! Also rampant in my garden is this cute little geranium which makes a great filler.


I found this silver tray recently at an op shop. It looks perfect with a mismatched collection of glass bottles and vases placed on its shiny surface. In order to ground the display and extend it's proportions to the width of the table, I placed some doilies underneath. If you've read my blog before you'll know that there is always a place for a crochet doily in this house!

Love this sweet little pansy face.

I'm loving the uplifting beauty of this display. Have you made any changes this month for the beginning of spring/autumn?

Styling the Seasons is a monthly styling challenge hosted by Katy at Apartment Apothecary and Charlotte at Lotts and Lots. Find out more by searching the hashtag #stylingtheseasons on social media.

Wednesday 16 September 2015

Snapshots from August

Hi again! This post is terribly late so I thought I better get it up while I can still remember details from August. The weather this week has suddenly turned springlike and my head is full of September, which makes winter seem a distant memory (at least until the next cold snap). It doesn't seem like very much has happened either... the last month of winter is always the hardest, when the rituals that marked the beginning of the season have lost their cosy aspect and started to feel worn and jaded. No more scented candles and hot chocolate, please!

One good thing about the sun rising late in the morning is that if you get a gorgeous sunrise, you can easily take a picture as you're leaving for work.

I never get sick of hellebores. Even when faded, they are still beautiful. And of course no matter what the season, I'll be working on some crochet with a coffee to hand!

In August the hellebores bloomed more profusely, and I was able to bring them inside for arranging. I love this simple hana style of ikebana. You've seen this photo of the gathered bouquet before, but here I have edited it to look like a painting! Skillz.

I've been continuing with my crochet puff square blanket. Some of the tail ends of yarn looked pretty turned into a flat lay. And here's a note to self not to forget that cyclamen flowers are great in a vase... They last for ages and if the stems are curved they make a great accent.

Here is Mr Lui giving the side eye. And another photo that I've edited into a painting! Can you tell that this month I sat inside and played on my phone a lot?

August was cold and very wintery. It rained a lot and a couple of storms blew through. Snow was forecast a couple of times but didn't eventuate, but it was still one of the winteriest winters we've had recently. The garden has been a bit slow to wake up, but I know that the mad growth of spring is right around the corner, and I'm glad to have had this time of rest.

Monday 7 September 2015

Adding a crochet hem to a dress, and Wavy Pocket crochet pattern

 I bought this dress a while ago because I thought it was cute with its polka dotted heart print. The dress was a good fit but was just a bit too short for me to be comfortable with. No problem, I thought, I'll just crochet a trim on the bottom, easy, and that will make it wearable! It was easy too, but as I am such a great procrastinator it sat in my wardrobe for at least a year (yes, truly) before I got round to doing it.

 Here it is at last! I started with a blanket stitch along the edge of the dress, then did a round in dc. I did 3 dc to each loop of the blanket stitch, but it depends on your stitch size - 2 dc might fit better. I used the edging for the All Shawl by Doris Chan which works up into this beautiful lacy pattern. I used thin 4 ply cotton yarn and a 3mm hook, and adapted the last row slightly to skip every second scallop and make the others a bit bigger (chain 4, sc into 3 ch space, chain 4, between each scallop).

I also thought that a couple of pockets would finish it off nicely! I created a pattern for these which picks up on the dc increases in the edging pattern. It also gives a a scalloped edge for the pockets.

Ch 19 to start.
Row 1: 1 dc in third ch from hook (as I wanted a slightly rounded corner I worked into the third chain rather than the fourth), 1 dc in next 15 chains, 2 dc in last ch.
Row 2: ch 2, 1 dc in same dc. 1 dc in next 17 dcs. 2 dc in last ch.
Row 3: ch 3, 1 dc in next 2 dc, skip 1 dc, *(2 dc, ch 1, 2 dc) in next dc, skip next dc, 1 dc in next 3 dc*, repeat from * till end of row.
Row 4: ch 3, 1 dc in next 2 dc, *(2 dc, ch 1, 2 dc) in ch 1 space, 1 dc in next 3 dc*, repeat from * till end of row.
Repeat pattern until pocket is desired size.

I have my new dress for spring, now all I need is some warmer weather so I can wear it... hopefully not long to wait now!

LinkWithin

Related Posts Plugin for WordPress, Blogger...