Showing posts with label embroidery. Show all posts

Tuesday, 19 February 2013

A tiny posy and a little bunny brooch

 Two posies actually, one small and one certifiably tiny. I was browsing through home decorating magazines on the weekend and noted how vases of flowers were often echoed with a smaller bouquet containing just a few of the blooms, which is then placed on a side table next to a chair, or a bedside table, or some place that needs accenting. It's a bit too stylish to work in my house, where side tables are receptacles for all kinds of debris and a little vase would just get buried or knocked to the ground, but a tiny vase of flowers? Yes please! So I made up the two posies and just put them next to each other on the windowsill.

 Cecile Brunner has the sweetest little buds, I just love picking them even though they only last a few days.

And here's a little bunny brooch I made. I saw a picture of one somewhere online and even though I didn't save the picture, the idea hatched itself in my mind: I must make and embroider a bunny brooch! I sketched out the cutest bunny pose and gave him a ribbon bow and some flowers to sit in. After I finished I realised it looked kind of springlike, and wouldn't it be fun to make a bunny for every season? The winter bunny can have a scarf and a grey wool background. I haven't planned summer or autumn bunny, but since I gave this brooch away I will need to make another for myself! Something else to add to my project list...

Monday, 17 October 2011

Vintage linen

I recently picked up some vintage linen at the local op shop. My idea was to use it as a base for embroidery so I was looking for plain, natural-coloured pieces. I found a few of those, and I even bought some which had flower patterns printed on them, with the idea that I could embellish the print. I also found lots of already embroidered pieces, and of course I couldn't just leave them behind.

It cost me $7.00 for the lot, which was great, but also sad, because there was an embroidered tablecloth with crochet edging which alone would have taken months to make. I know all crafters feel the pang when they see something sold so cheaply which has taken so much work to make, but the flip side is that at least it is coming home with me to be loved and cherished! And I can't help feeling pleased on the whole, because there is a lot of fabric there which would have cost a lot more than $7.00 to buy new.

A lot of the fabric was stained or yellowed, so my first task was to wash it. I asked google first and found that the first thing to try is soaking in vinegar, so I added half a cup to some warm water and put them in for a few hours. Then I rinsed them well and put them out in the sun. I was surprised at how well this technique worked - a lot of the lighter stains were gone. There were a few spots and darker ones left, so I'll try a dab of lemon juice next, then dry in the sun.

This is the tablecloth I was talking about. It probably had the worst staining, but I'm pretty confident I can get it out, and if not I'll embrace it as part of the character of the piece! I'd like to have an embroidered tablecloth for every season... this will be spring, with its soft pinks and greens.

This is one I already had, but it was in the cleaning pile because it had a tiny smear of printer ink on it. I'd been too scared to try and get it out before, but the vinegar soak faded it a lot, and I'm hoping lemon juice will finish it off. Hydrogen peroxide will be my last resort.

Now it's time to get the iron out (don't worry, I'm a freak who actually enjoys ironing). Then I have to finish my current embroidery project (only two lines of backstitch to go!) and then I'll have a play with all this lovely fabric.

Wednesday, 5 October 2011

Embroidery

I've been playing with pretty threads this week. Gorgeous silk and cotton and rayon, and the loveliest textured linen to work on. I work back stitch and chain stitch and french knots and crosses. Tone on tone or bright splashes of colour.

This is a tapestry sampler - a little square worked on canvas that can be sewn into a pincushion or sachet. It came from the studio of Jane van Keulen - a textile artist who hand dyes a range of beautiful threads. She also has some lovely kits, and I stocked up on several - three different tapestry samplers, and a larger needlework piece, as well as some hand dyed threads and linen. So far all I've finished is the above piece, but I'm having fun with it. Embroidery is so lovely and tactile, the threads shimmer and shine and each different stitch provides a different texture.

Such a delightful way to spend an afternoon. Unfortunately I can hardly see to do it unless it's daylight, so luckily I still have my crochet patchwork blanket to occupy me in the evening. It's satisfying to be feathering my nest with such pretty things.

Wednesday, 15 July 2009

Finished embroidery

I finished another little embroidery square. This was a little doodle of Lui that I sketched on the linen with a wash-away marker. It was fun fillling it in and adding french knots here and there - I even improved upon my satin stitch!

I'm having visions of making a quilt - embroidered squares combined with plain squares of linen or cotton in matching hues. Hah - you know it will never happen! For one thing, I've never made a quilt before, and I'm quite turned off by the idea of having to measure and be precise and get everything exactly right. However, I'm enjoying playing on these little squares, so I'll continue with them. I'll just tell myself that I'm actually going to use them on something one day.

Friday, 10 July 2009

How to make embroidered jam jar covers

MATERIALS
Cotton or linen fabric - plain, and patterned
Stamp
Fabric ink pad
Embroidery floss
Hoop, needle and scissors
Fusible webbing
Wash-away marker
Round things to trace around (like bottles and dinner plates)

Trace around a small jar or bottle to make a circle on a piece of plain fabric. This is for the centre image, so you don't want it too big - mine were about 5 cm diameter. Either use a wash-away or fade-away marker, or use any marker and make sure you trim off the outline. Cut out the circle.

Cut a large circle from the patterned fabric (trace around a plate). Mine was about 18 cm diameter.

Stamp your design in the centre of the small circle, using a fabric ink pad. These usually require ironing to heat set. While you have the iron out, cut a piece of fusible webbing to fit the back of the circle and iron it on. Then iron the small circle in the centre of the large circle.

Put your fabric in a hoop and stitch around the edge of the small circle, using a matching or contrasting colour thread. I did one with running stitch and one with cross stitch, but you could use any embroidery stitch - even embroider tiny flowers and leaves.

Remove the fabric from the hoop. Trim the edges with pinking shears if desired, then put the cover on your jam jar. Hold in place with a rubber band and decorate with ribbons.

Wednesday, 8 July 2009

Embroidery floss epiphany

I need some embroidery thread for a project, so I go into my art room and grab the bag of floss. There is an exact shade of burgundy I am pretty sure is in there, and I need it quick, so I tip out the bag and reach out my hand -

- to be confronted with this.

A pretty selection of colours, to be sure, lovingly wrapped close about each other, twining and matting together. Some are still in their skeins, some are wound onto cardboard bobbins, some rolled into balls. Once I planned to wind them all onto bobbins and I cut multiple small pieces of cardboard. I got through about three skeins and realised: this is boring! And it will take forever. I shoved the leftover bobbins in the bag and resolved to do it while watching a really great dvd one day. Of course that day never came.

Back to the art room, and I am standing there, staring at my flossy mess and it suddenly occurs to me: I could put them in separate plastic bags! A little bird outside the window starts singing hallelujah, my heart lifts and I know my purpose in life. I grab a packet of small ziplock bags and start stuffing.

Skeins go in. Balls go in. Messy tangled bunches go in. If the skein wrapping has fallen off, it just goes in the bag too! If you have separated off four strands for embroidery and only used half, the rest just gets wound up and put in the bag too! No more little piles of half-used embroidery thread that you can't remember what skein it came off and they all gather up together and get tangled and eventually you just throw them out.

Then comes the fun part: colour theming! I put orange/yellow together, pink, red, brown, separate out all the different shades of green. All the colour groups go in their own larger ziplock bag. (but what would really be wonderful is an ornately carved wooden box, with lift out compartments, and each colour would have its own compartment...)

Done, with a sigh of satisfaction. (Seriously... it is winter here, long and cold, and I will take a little piece of happiness wherever I can find it!)

PS. I did eventually get on with my embroidery project - more on that in the next post.

Monday, 22 June 2009

Weekend crafting

This weekend I spent a bit of time with my embroidery hoop and thread. I just wanted to play and not worry about finishing something, but it went fast and I ended up with this. Not that it is anything... I'm not even sure what it could be. A patch on a bag? A very small pillow?

My most and least favourite stitches next to each other... French knots (favourite) and satin stitch (least favourite).

I had so much fun I even sketched up a design for another tiny pillow.

I also decided to make an afghan for the couch in the lounge. All in one colour, since I'm trying to theme the room in chocolate and turquoise, and for some reason I decided it would be better to make a throw than to buy one.

But not quicker... nine down, and I don't know how many to go. The plan is to just make as many as I feel like, since the throw will be just for decorative purposes (ie artful draping over the arm of the couch). The design is Alhambra from Jan Eaton's 200 granny squares book.

But maybe I started too soon - I just love this delicate pattern from Mypicot. And it looks so pretty multiplied. Oh well... who says a couch can't have more than one afghan... just as long as the first one gets finished!

Tuesday, 16 December 2008

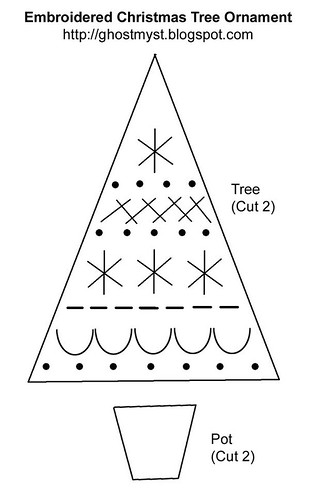
Little embroidered xmas tree - a tutorial

I made these little trees for the Kiwi Christmas Ornament Swap. They were such fun that I thought I'd share the process in a tutorial.

Read on and soon you too will have a little embroidered forest...

(Click here to get the full sized pattern)

Supplies:
Cream felt
Blue felt
Fabric of your choice for back side (I used craft cotton and sealed the edges with a dab of glue to stop them fraying. You could use felt for this side as well, and even embroider it if you feel keen!)
Embroidery thread in pale blue, mid blue and dark blue
Embroidery needle and beading needle
Silver seed beads
Cream organza ribbon
Stuffing
Wash-away fabric pen

Cut out one tree shape from cream felt, and one from the backing fabric. Cut two of the pot shape from blue felt.

Transfer the design to the cream felt with a wash-away transfer pen.

Using 3 strands of thread: embroider the bottom row of french knots in mid blue.

Embroider the middle row of french knots in mid blue.


Embroider the top row of french knots in pale blue.

Still using 3 strands: Make a line of running stitch in pale blue thread.

Make a line of herringbone stitch in dark blue thread.

Make a line of scallop stitch in dark blue thread.

Now using one strand of thread: Make the top lazy daisy in mid blue.

Switch to a beading needle if neccessary and stitch on a silver seed bead.

Do the same for the row of 3 lazy daisies. All the embroidery is now complete! Rinse in some water to wash away the pen lines, and let dry.

Take your two blue pot pieces and sandwich a piece of batting in between them (use a small piece of stuffing if you don't have batting).

Blanket stitch the two pieces together. It doesn't matter if the batting pokes out at the top a bit.

Now, take your embroidered felt and backing fabric, and place them wrong sides together. Pin them if you like. Holding the tree upside down, begin blanket stitching about 1cm in from the top left corner.

When you are about 1.5cm from the top, take a piece of ribbon about 17cm long. Fold it in half and pinch the 2 ends between the felt and backing fabric. Hold it in place as you stitch around the top of the tree.

When you get back to the bottom of the tree, stitch about 1cm past the corner. Then fill with stuffing. Use a paintbrush or something similar to push little wads of stuffing into the corners.

Insert the pot into the gap and continue stitching to close the gap.

To finish off, tie a bow at the top with matching ribbon. Secure at the back with a dab of glue if neccessary.


Saturday, 22 November 2008

Note to the Universe

Dear Universe,

I would like a little house.

With some nice rooms to live in

A big garden

Plenty of sun

And lots of space for the boy, the cat and me.


Please deliver ASAP.

Lots of love,
Ruth

LinkWithin

Related Posts Plugin for WordPress, Blogger...