Showing posts with label craft. Show all posts

Wednesday, 27 January 2016

Greg crochet blanket

 Hi everyone, I'm so excited to show you my latest completed blanket. I've been crocheting for about eight years and I honestly don't know what I'd do with myself without it these days! I'm constantly driven by the need to create but I don't always have the time or energy to plan something brand new, so having a big project on the go that can be worked on in little bits is the perfect use of creative time. Last year I was working on a blanket (of my own plan), but then I came across this crochet along and just had to get in on it. A crochet along (CAL) is when little parts of a pattern are released across a period of time, usually giving you a couple of weeks to complete part A before part B is released, and so on. It seemed to me to be a good way to finish a decent size blanket in a decent amount of time! 

 This CAL was hosted by Shelley at Spincushions. The name of the pattern is Greg, and each individual square has a name - Tom, Joe, Tim, Ian and Bob. These brothers are rather handsome, I'm sure you'll agree. I decided on Shelley's suggestion to work my blanket all in one colour, which I love as it really highlights the texture in the squares. I hadn't made anything so textured before and I love it - I'll be coming back to these stitch combinations in future projects I'm sure! I also really appreciated the advice on how to construct the square so the start of each round is as invisible as possible - really good tips that I'll utilise in future.

 To join the squares I used this technique. (sc, ch 1, skip 1) I couldn't do the diagonal join because the squares are different sizes, but the actual joining stitch was super quick. I will definitely use this technique again in future.

 There is a border pattern given as part of Greg, but I decided to repeat the pattern from Bob (the largest squares). I liked the idea of repeating it and I especially like the V-stitch row! Lastly I edged it with a row of hdc in aqua yarn.

 Here is Greg in all his splendour! He has turned out a decent size for a lap blanket, and perfect for a throwing-over-the-back-of-the-couch blanket.

I had to take Greg outside for a photo shoot too. Doesn't he look lovely draped over my park bench? 

The CAL finished up before Christmas, but life got in the way and I worked on him a bit less for a few weeks. But he's finished now, and I still consider four months for a blanket to be very good time!

If you want to make a Greg of your own, you can find all the information at the Spincushions website. I have also updated my Ravelry page with details of this project.

Saturday, 26 September 2015

Puff Stitch Pincushion crochet pattern

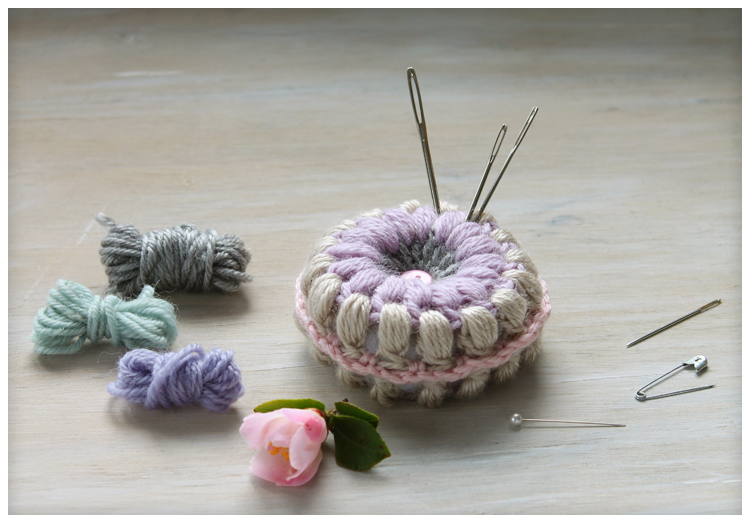
 I've been working on squares for my latest blanket, and having a lot of fun with the process. I've made a lot of circles and soon the time will come to add the last round of stitches and turn them into squares. As happy as that thought makes me, I'll miss having all these circles around, so I decided to turn a couple of them into a pincushion. I really needed one to store all my yarn needles as I am forever losing them down the couch, so it was the perfect opportunity to fulfil several needs!

 The spaces between the puffs are great for jamming a thick needle in! You can also attach safety pins or stitch markers around each puff.

You could use this as a scissor keep, although I find those a bit bulky, so I just made a loop for it so I can pin it to the side of the couch when I need to keep it handy.

Puff Stitch Pincushion crochet pattern

Working a puff stitch: yo, insert hook into space and pull yarn through (3 loops on the hook), repeat 3 times (9 loops on the hook). Keep your tension quite loose as you are doing this - the loops should not be wrapped tightly around the hook. Yo again, then carefully draw the hook through 8 loops (2 loops on hook). Yo and draw the hook through the last 2 loops.

Round 1: Ch 4, make 15 treble crochet stitches into a magic ring.
Round 2: Ch 2, make 16 puff stitches, working into the space between each tr, with 1 ch between each puff.
Round 3: Repeat Round 2. Fasten off.

Make two circles, then hold them wrong sides together. Work all stitches into both circles to join them. With a contrasting yarn, attach with a slip stitch into one of the ch 1 spaces. Ch 1, 1 sc into same space, ch2, 1 sc into space between puffs, repeat until 3/4 of the circles are joined. Stuff the pincushion, then finish joining. Before fastening off, ch 20 to make a loop for hanging. Join the end of the loop and fasten off.

Take 2 small buttons and sew them one on each side of the pincushion, drawing the thread tight between the buttons. Fasten off thread.

Monday, 7 September 2015

Adding a crochet hem to a dress, and Wavy Pocket crochet pattern

 I bought this dress a while ago because I thought it was cute with its polka dotted heart print. The dress was a good fit but was just a bit too short for me to be comfortable with. No problem, I thought, I'll just crochet a trim on the bottom, easy, and that will make it wearable! It was easy too, but as I am such a great procrastinator it sat in my wardrobe for at least a year (yes, truly) before I got round to doing it.

 Here it is at last! I started with a blanket stitch along the edge of the dress, then did a round in dc. I did 3 dc to each loop of the blanket stitch, but it depends on your stitch size - 2 dc might fit better. I used the edging for the All Shawl by Doris Chan which works up into this beautiful lacy pattern. I used thin 4 ply cotton yarn and a 3mm hook, and adapted the last row slightly to skip every second scallop and make the others a bit bigger (chain 4, sc into 3 ch space, chain 4, between each scallop).

I also thought that a couple of pockets would finish it off nicely! I created a pattern for these which picks up on the dc increases in the edging pattern. It also gives a a scalloped edge for the pockets.

Ch 19 to start.
Row 1: 1 dc in third ch from hook (as I wanted a slightly rounded corner I worked into the third chain rather than the fourth), 1 dc in next 15 chains, 2 dc in last ch.
Row 2: ch 2, 1 dc in same dc. 1 dc in next 17 dcs. 2 dc in last ch.
Row 3: ch 3, 1 dc in next 2 dc, skip 1 dc, *(2 dc, ch 1, 2 dc) in next dc, skip next dc, 1 dc in next 3 dc*, repeat from * till end of row.
Row 4: ch 3, 1 dc in next 2 dc, *(2 dc, ch 1, 2 dc) in ch 1 space, 1 dc in next 3 dc*, repeat from * till end of row.
Repeat pattern until pocket is desired size.

I have my new dress for spring, now all I need is some warmer weather so I can wear it... hopefully not long to wait now!

Sunday, 3 May 2015

Finished at last: Moonlit Night blanket

Camellia Rose - the Moonlit Night blanket
I've finished my Moonlit Night blanket, hooray! It's lovely and soft and snuggly, just in time for winter. Let me tell you a bit about it!

I first had the idea back in 2011 when I was making granny squares for another project. You can read the details on that in this post. I never finished that project though, and actually ended up reusing a lot of the yarn for this blanket!

Camellia Rose - the Moonlit Night blanket
I used three shades of grey yarn and a white. They are all different brands... a fuzzy dark grey for the centre, then a mid-dark grey, then a pale tweedy blue-grey. The white was a super cheap ball of acrylic that wasn't that nice but did I say it was cheap? Important as I used so much of it. I'm not a yarn snob with my projects, I'd like to be but just can't afford to!

Camellia Rose - the Moonlit Night blanket
The last step, and that which I modestly think sets it above other granny square blankets, was adding mother of pearl buttons to alternate squares. These represent the full moon slipping behind clouds. Also, they are shiny and pretty and really catch the eye when the blanket is draped resplendently over the couch.

Camellia Rose - the Moonlit Night blanket
 The blanket is 10 x 15 squares. It turned out to be the perfect size for couch-draping! I also congratulate myself because it took less than a year to finish! Ok, eleven months actually. But since my last blanket took two and a half years, I'm happy with that!

Camellia Rose - the Moonlit Night blanket
 Here it is in its full glory. I used the join-as-you-go method for joining the squares which saved a heap of time. It's great for a blanket like this where you don't have to work out a colour scheme as you go.


Camellia Rose - the Moonlit Night blanket
 Here is the pattern for the edging:
Round 1: SC in white all the way around to even off your granny squares. SC two together where the squares meet.
Round 2: in dark grey, sc 2 in 1 sc space, ch 1, skip 1 sc, sc 2 in 1 sc space, repeat. (I did 2 sc because the dark grey fuzzy yarn is fairly thin - if your yarn is thicker just do 1 sc in each space.)
Round 3: in white, 1 sc in ch 1 space, ch 1, skip 2 sc, 1 sc in ch 1 space, repeat all around.
Round 4: in white, sc all around.
Round 5: in mid grey, sc all around.
Round 6: in light grey, sc all around.
Round 7: in white, make scallops: 5 dc in one sc, skip 1 sc, 1 sc, 5 dc in 1 sc, repeat.

Camellia Rose - the Moonlit Night blanket

You can also see this project on my Ravelry page. I'm so happy to have this finished but I'm already having withdrawal... the only question is, what to make next?

Sunday, 19 April 2015

Crochet musings

 I'm nearly finished my Moonlit Night blanket. 99% in fact - so close I can taste it - but, as always happens when I'm close to completing something, I've lost interest in it and can't concentrate due to thinking about what I'll start next. So many possibilities! But before I start trawling Pinterest for yet more ideas, I thought I'd better cast around and see what else is lying around that I could do. There are plenty of other projects at the 80-90% mark, and also supplies I've bought and not got around to using yet... maybe just maybe I could actually use up something I've already got on hand!

 I've got this white jar cosy almost finished. All I have to do is edge it, and then I want to cross stitch a rose on it, a bit like this pin. I also have this pretty vintage pillowcase which I think will suit a pink lacy border.

 Every year I crochet myself a new pair of fingerless gloves. Last year I made the super cute Mr Fox fingerless gloves. This year I want to do this pattern by Crejjtion. I've even got the yarn, this lovely soft grey.

 I've also been obsessing over this hat - again, it has a cross stitch rose on it, clearly I need to make at least one thing embroidered with a rose before I'm able to move on! I still have this strip, left over from another project, to use and there should be enough colours in my cotton thread stash. Hmm, ponder ponder.

There's also a skirt which I want to hem with a lacy border and I'd like to make some more padded coat hangers. I've had plans for ages to make another crochet handbag and my life isn't really complete unless I'm working on some kind of blanket. So... there's no shortage of things to do, the biggest trouble is just deciding which project to work on!

Wednesday, 4 December 2013

Pinterest made me do it: Heart shaped wreath

Oh, Pinterest. Such a great way to spend an hour or an evening, browsing and finding inspiration and being able to save it to come back to later. That's what I tell myself anyway, as I create boards and pin picture after beautiful picture, mind buzzing with ideas and creative plans. The reality is, I have hundreds of ideas pinned and while I love every one of them, I'll never get through them all in ten lifetimes. You might remember at the start of this year I decided to take 12 of my unfinished projects and finish one each month? Well, I fell off that wagon pretty quickly. That's why it's worth me celebrating when I actually finish something, and if it's come about because I saw it on Pinterest, that's fine too! So here's the first thing Pinterest made me do... a heart shaped wreath.

I was inspired by this pin. It's pretty simple... a wreath shaped like a heart with a few delicate roses attached. I used flax to make my wreath, and joined it together with fine wire. Then I wired on some leaves and roses.

They used paper flowers in the original but I thought I'd try attaching some of my Cecille Brunner rosebuds, as they should hold their shape when they dry. The cherry tree leaves got floppy quickly so I used some double sided tape to hold them in place. It will be interesting to see how this holds up as it dries - I may end up using paper flowers in the end if I don't like how it looks.

For now I love this easy and completely home made piece of decor! How about you... has Pinterest inspired you to create anything?

Thursday, 7 November 2013

Wood painting

Time is flashing by so fast at the moment! I've had this post saved as a draft for a couple of weeks waiting for a minute to sit down and add the words to it. Other things just seem to be demanding my attention, mostly the call of the outdoors! The weather is mild and the evenings are bright and if I'm on the computer at all I'm mostly browsing Pinterest for new ideas. Spring is such a creative time for me.

A few weeks ago I felt the urge to paint something. I bought a few test pots from Dulux of pretty pastel colours and rounded up all the wooden things I could find in my kitchen. For the wooden spoons I just put a strip of masking tape around the handle, and painted the end. Quick, easy and cute!

I didn't stop there... I painted the handle of the lemon juicer, the rolling pin and the edge of the bread board! Then I gave everything a wax and polish.


This was a quick, easy and most satisfying way to add some colour to the kitchen! Using those wooden spoons has made cooking much more fun. 

Have you been creative this spring/autumn?

Tuesday, 9 July 2013

Vintage-look birdhouse wall decoration

 Earlier this year I decided to make a birdhouse. Ever since I got my garden I've wanted to put a grouping of  rustic, wooden, handmade birdhouses somewhere together. I had some wooden planks lying around to use, and I figured it couldn't be that difficult to cut them to shape and hammer them together. (I'm a fan of the rustic look - imperfections are my friends!) I cut (with my hand saw) a couple of house shaped pieces, and they sat around the garden for a month or so while I debated whether to cut walls out of the same plank or look for some thinner wood. It was very thick you see, and would have made for a rather chunky birdhouse. I was also a bit wary of the drill attachment that makes the big holes; it would require a trip to Bunnings and some enquiring and figuring out on my part and I hadn't quite gotten round to it yet, not to mention what was I going to use for the roof? So all these things were percolating until it occurred to me... it doesn't need to be an actual house... I could just paint it to look like one! And once that decision was made the entire process became easy peasy. (Note: I didn't make the taller birdhouse, this tutorial is just for the smaller painted one.)

Here's how I did it...

 Supplies: wooden plank cut to a house shape (mine measured approx 20 x 11 cm), a small decorative picture frame for the roof, a chopstick, strong wood glue, paint in a light colour and a dark colour, sandpaper, varnish.

 I used the same technique as for my Vintage-look Garden Sign to distress the wooden house shape. Once that was done I painted a circle for the birdhouse hole. I then cut a chopstick to approx 2.5 cm long, drilled a short hole in the front of the house for the perch, and glued the chopstick in place.

A fancy picture frame makes a great faux roof! Mine was the right size so all I had to do was snap it in half diagonally, and carefully file and sand the sharp edges. Then I glued the pointed house roof within the frame. (Spray paint the frame before you glue it on if you want to change the colour.)

If you're going to keep your birdhouse plaque outside, give it several coats of a good outdoor varnish. Attach a wire or picture hook at the back for hanging, or just prop it up behind some pots!

Have fun creating your own birdhouse groupings, I'd love to see pictures if you make one!

Linking up to Matariki Crafting at Tartan Kiwi.

Sunday, 31 March 2013

Easter egg decoration tutorial

I don't usually decorate for easter, but I kept seeing pictures of easter egg trees around the internet. They are pretty cute, and really, why turn down an opportunity to make a little tree and hang decorations from it? Read on to find out how I made these cute little egg decorations.

I used Liquid Pearls to paint tiny flower designs on the eggs. These eggs happen to be plastic, but you could go old school and blow the yolks out of some real eggs too.

Liquid Pearls are a really handy craft product to have lying around! I've used them on all sorts of things from cards to candles. They are a dimensional pearly paint, which you squeeze on in a little blob and it stays raised up when dry. (Here is a good place to buy Liquid Pearls.) You will also need some plastic craft eggs, wooden skewers, thin satin ribbon, and glue.

You can use as many or as few colours as you like. My eggs were different colours, so I used several different paint colours as well. If your eggs are all white, it could look nice to just use two or three paint colours for the flowers. The colours I used were Buttercup, Baby Blue, Lavender Lace, Mint, and Petal Pink.

The plastic egg will have a little hole in one end. Wedge the wooden skewer in the hole so you have something to hold onto while you are painting the egg. (If the hole is bigger than the skewer wrap a bit of blu-tack around to secure it.)

Use the Buttercup Liquid Pearls to make dots for the centres of the flowers. Make sure they are well spaced out to allow room for petals.

Use a second colour (here I'm using Lavender Lace) to make the petals. To do this, squeeze out a dot of paint, then move the nozzle in towards the centre to extend the dot in a petal shape. Do five or six petals for each flower. Then put the end of the skewer in some blu-tack or a piece of foam or polystyrene until the paint dries.

Cut a piece of narrow satin ribbon for the hanging loop. Cut the ends of the ribbon on a sharp diagonal, then use the wooden skewer to push them into the hole in the end of the egg. Then secure with a drop or two of glue.

Make an easter egg tree by securing a couple of twiggy branches in a vase (use a flower frog to hold the branches so they don't flop around). Then decorate with your eggs. I think eggs in different sizes would look cute, and crochet flowers never go astray. This might be the first time I decorated for easter, but it won't be the last! Do you decorate? Have you ever done an easter egg tree?

Friday, 1 March 2013

Nearly


The end of the month has come and gone, so where is my finished project? I'm still working on it... but I'm nearly there! I've sewn a zipper and I just have to do the waistband. Then will come the moment of truth... trying it on...

In the meantime I've coated some cherry tomatoes in oil, garlic, oregano and a dash of salt and sugar and put them in my dehydrator. Dried tomatoes are my little wintertime treat for those sad days when I can't have them fresh.

Well, let's hope the sewing gods smile on me this weekend. I'll let you know soon!

Tuesday, 19 February 2013

A tiny posy and a little bunny brooch

 Two posies actually, one small and one certifiably tiny. I was browsing through home decorating magazines on the weekend and noted how vases of flowers were often echoed with a smaller bouquet containing just a few of the blooms, which is then placed on a side table next to a chair, or a bedside table, or some place that needs accenting. It's a bit too stylish to work in my house, where side tables are receptacles for all kinds of debris and a little vase would just get buried or knocked to the ground, but a tiny vase of flowers? Yes please! So I made up the two posies and just put them next to each other on the windowsill.

 Cecile Brunner has the sweetest little buds, I just love picking them even though they only last a few days.

And here's a little bunny brooch I made. I saw a picture of one somewhere online and even though I didn't save the picture, the idea hatched itself in my mind: I must make and embroider a bunny brooch! I sketched out the cutest bunny pose and gave him a ribbon bow and some flowers to sit in. After I finished I realised it looked kind of springlike, and wouldn't it be fun to make a bunny for every season? The winter bunny can have a scarf and a grey wool background. I haven't planned summer or autumn bunny, but since I gave this brooch away I will need to make another for myself! Something else to add to my project list...

LinkWithin

Related Posts Plugin for WordPress, Blogger...